个人图床-Go实现
https://github.com/meowrain/img-bed-Go
使用到的框架: Gin
使用到的库:
github.com/chai2010/webp
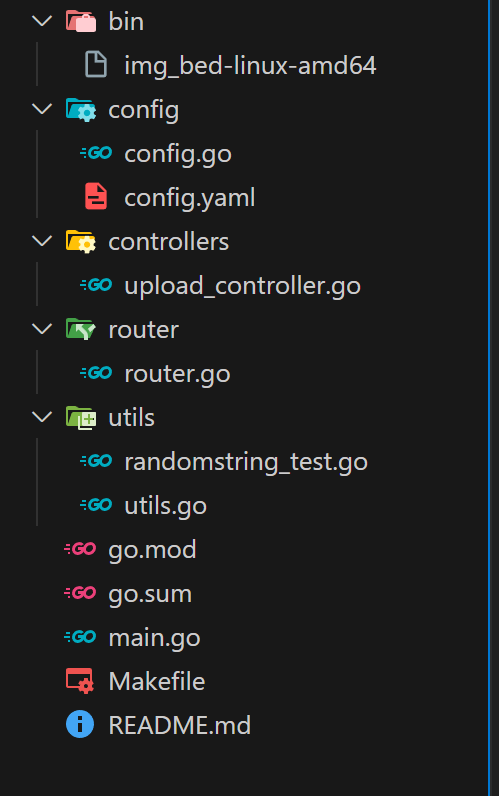
一.目录结构
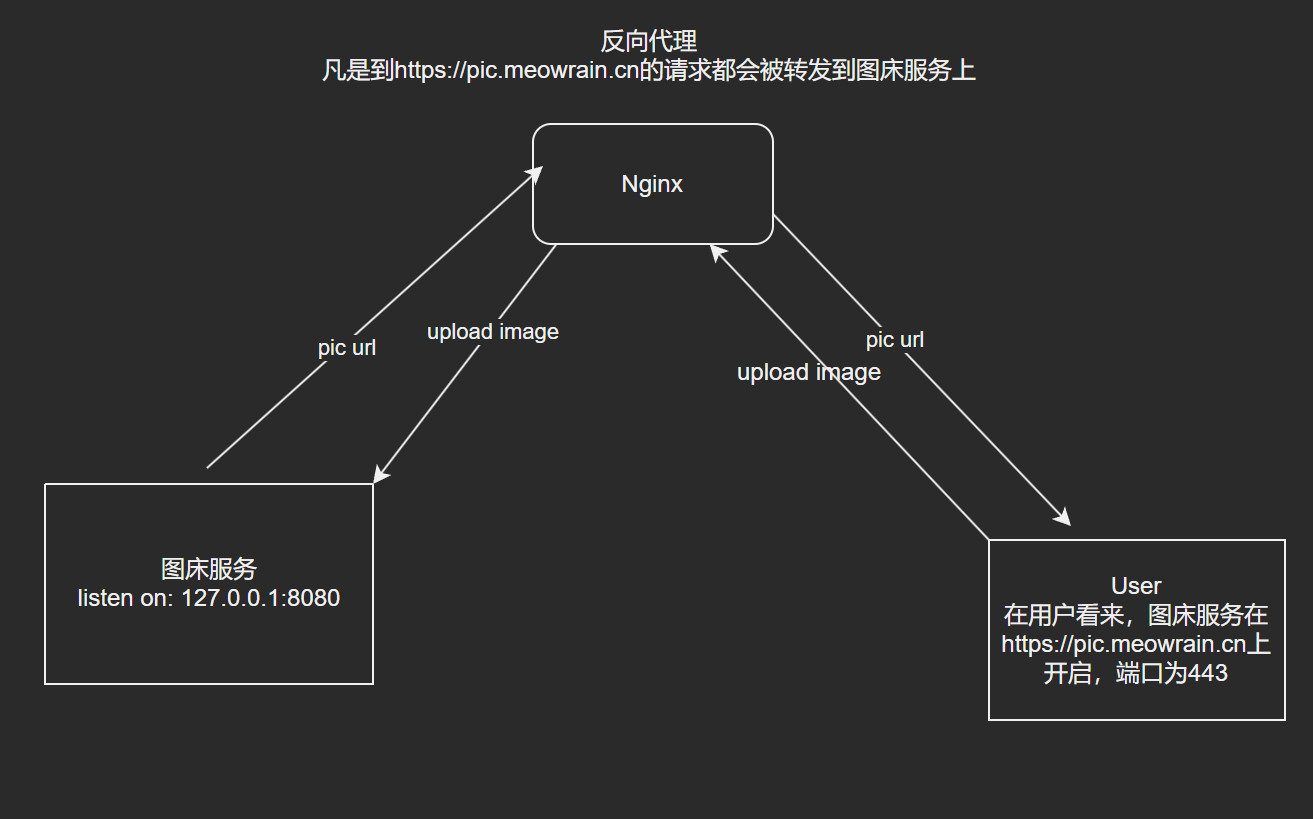
项目如何运行?
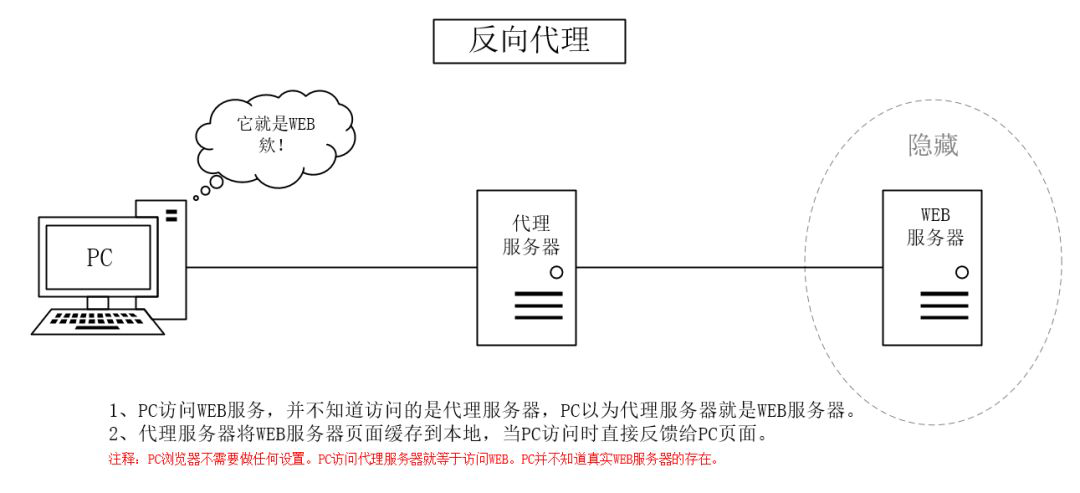
什么是反向代理?
二.安装相关库
go get -u github.com/gin-gonic/gin
go get -u github.com/chai2010/webp
go get -u gopkg.in/yaml.v3
go get -u "github.com/gin-contrib/cors"
三.配置读取-config/config.go
在config文件夹中编写config.go
分段分析
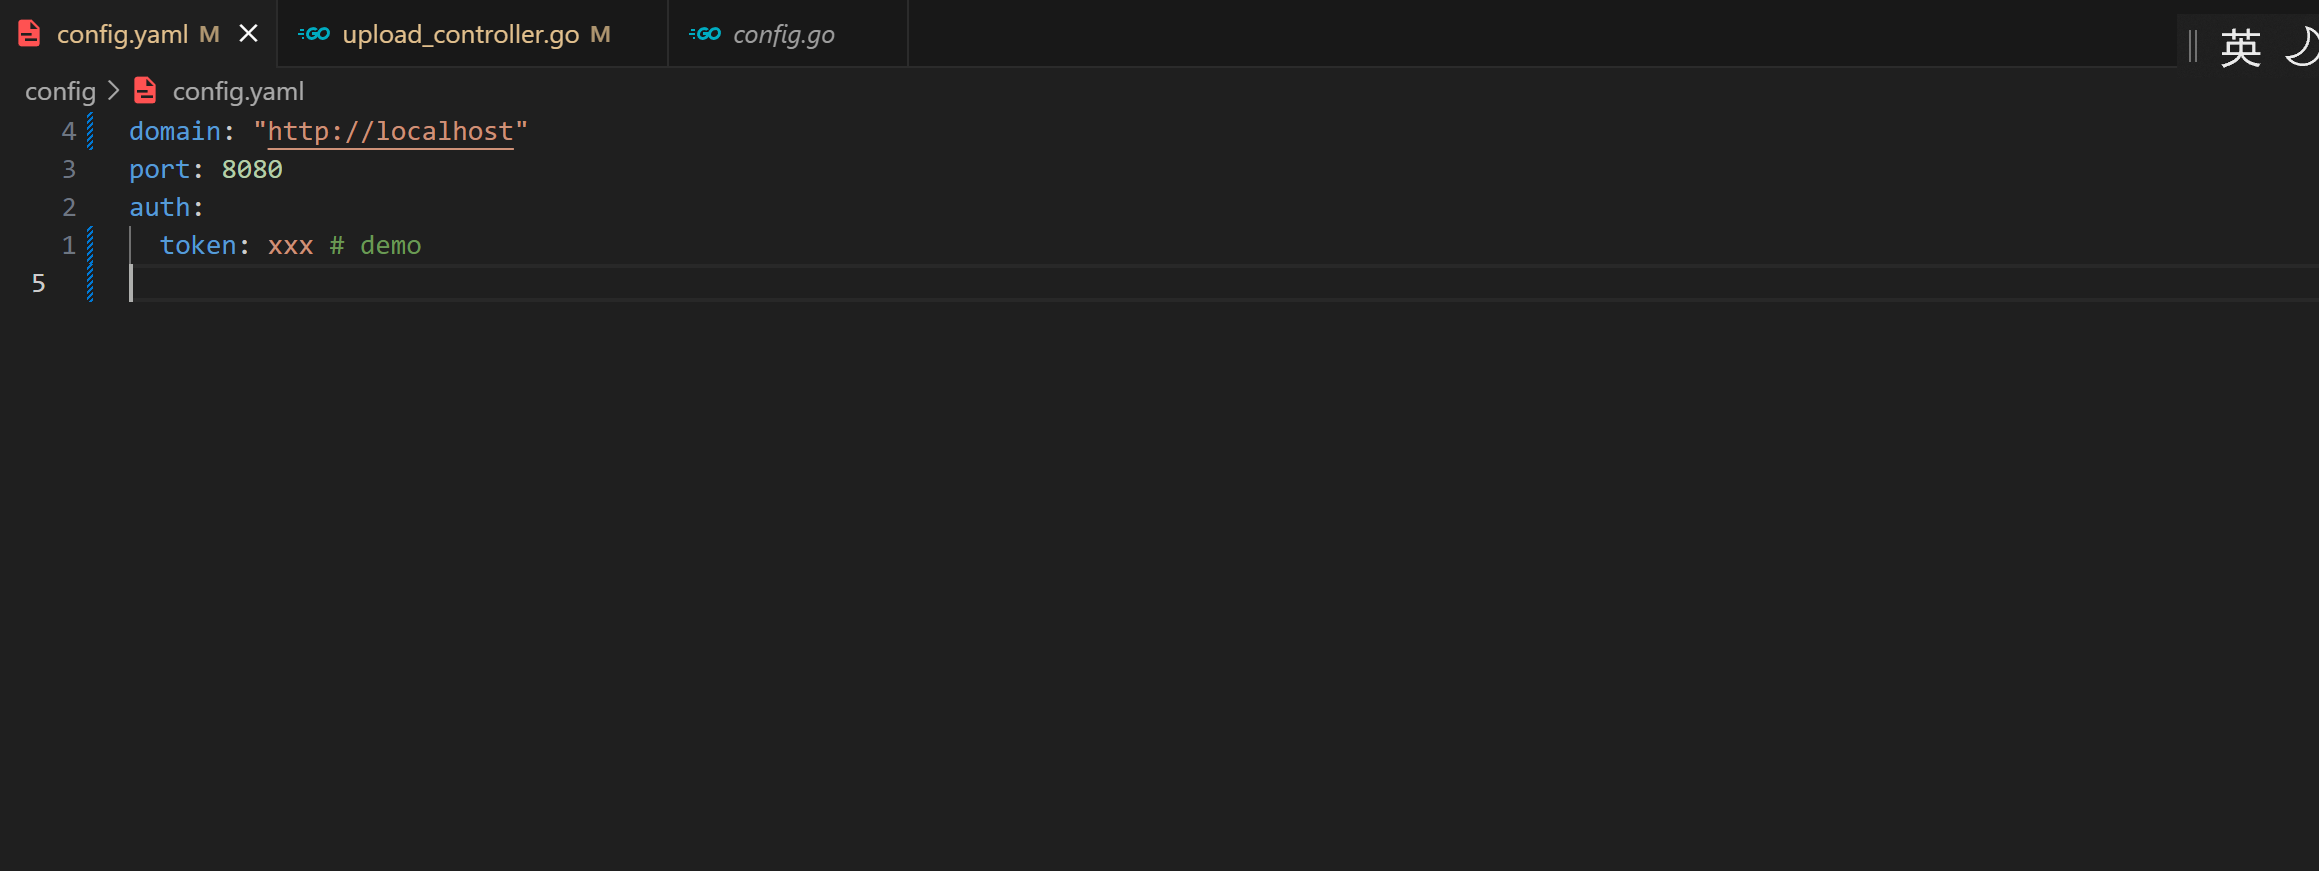
我准备读取下面的配置文件
Domain: "http://127.0.0.1"
port: 8080
auth:
  token: xxx # demo
这里需要分析一下我们的配置文件为什么这么写,Domain这个用来以后找你的图片,比如你准备把图床的网站域名设置为:
https://pic.meowrain.cn,那么当你向http://your server ip:8080发送post请求上传图片后,会收到后端响应,响应给你的地址也就是https://pic.meowrain.cn/year/month/day/xxxx.webp因此为了我们访问图片能访问到,你需要为你的webserver(比如nginx或者caddy)设置一个反向代理
那么我需要编写对应的结构体,在config.go中
type Config struct {
    Domain stgring `yaml:"domain"`
    Port string `yaml:"port"`
    Auth struct {
        Token string `yaml:"token"`
    } `yaml:"auth"`
}
然后我们需要一个公共变量供外部函数调用
var Data Config
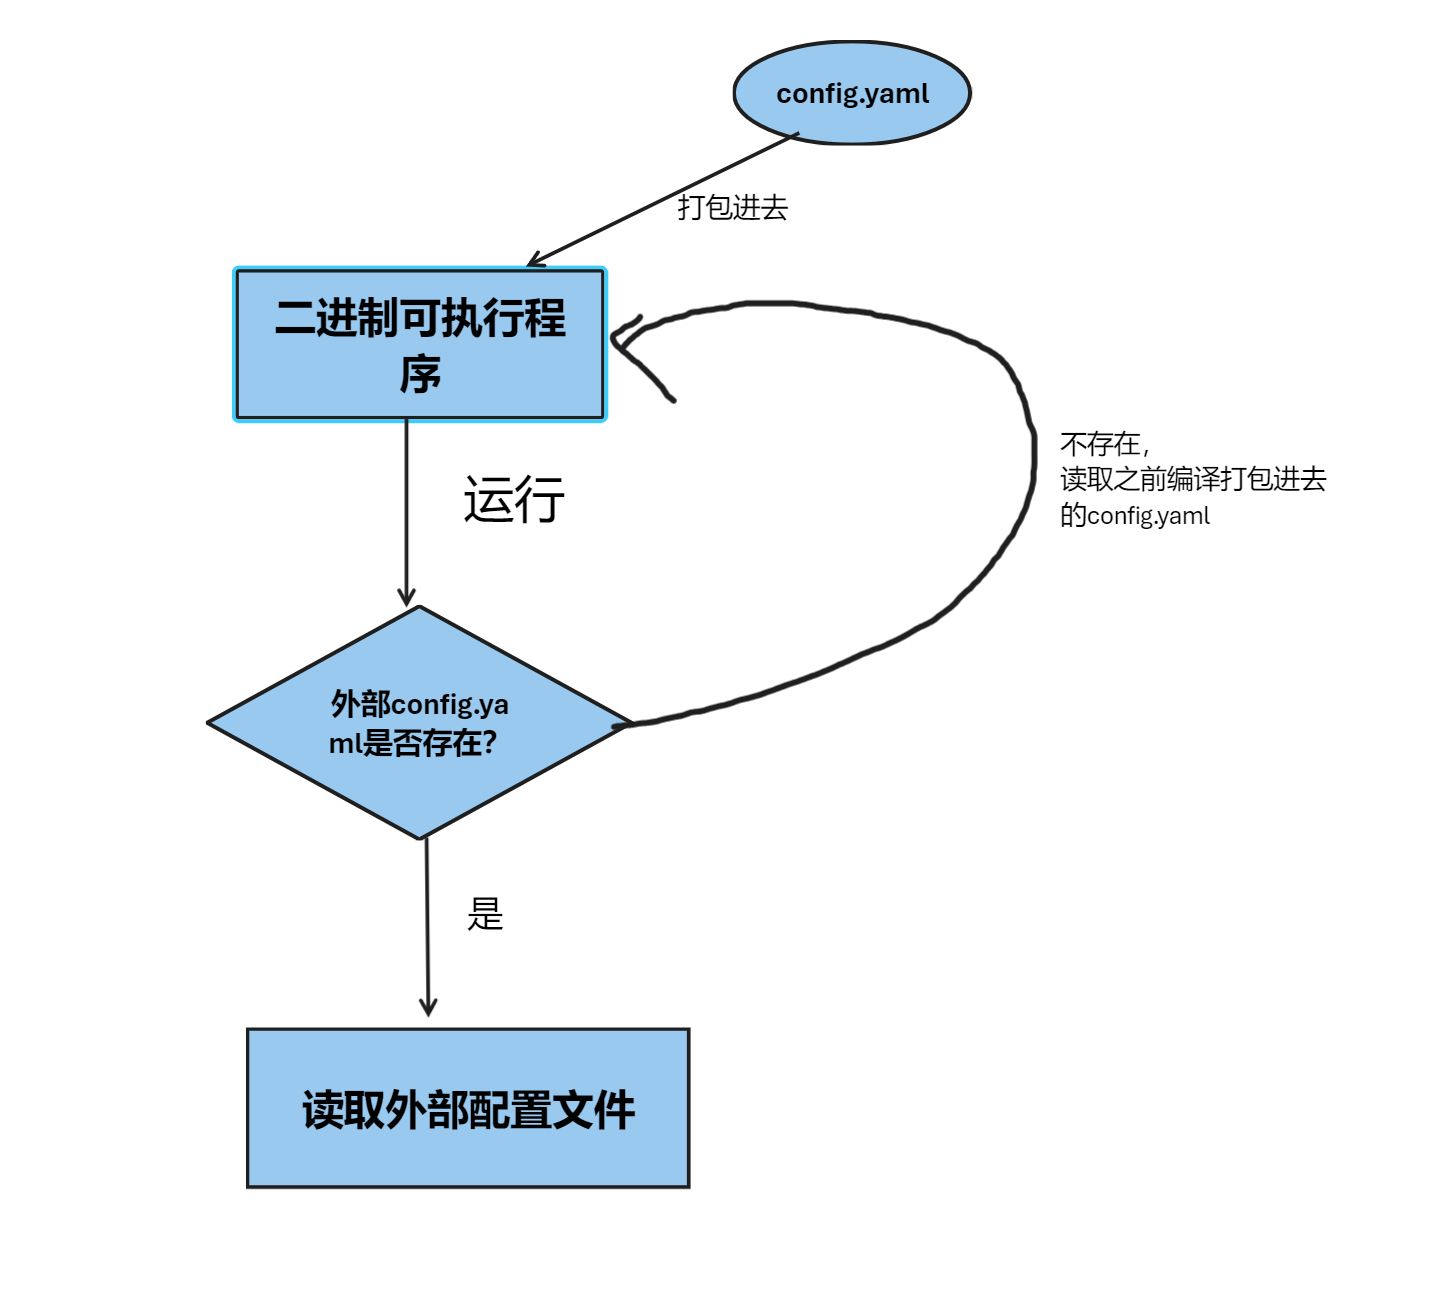
为了能在用户不编写config.yaml的时候程序也能正常运行,我们需要用到go的embed,方便把配置文件一并打包到二进制文件中
//go:embed config.yaml
var EmbeddedConfig embed.FS
为了在程序启动时候能够读取配置文件,我们需要编写对应的init函数
这里简单介绍一下init函数
init()函数是一种在Go语言中用于执行初始化操作的特殊函数。每个包可以包含多个init()函数,它们会在包被导入时按照顺序自动执行。init()函数的调用时机为:
- 当包被导入时,
init()函数会按照导入的顺序自动执行。- 同一个包中的多个
init()函数按照编写的顺序执行。
func init() {
    var bytes []byte
	var err error
	bytes, err = os.ReadFile("config/config.yaml")
	if err != nil {
		fmt.Println("读取外部配置失败")
		bytes, err = EmbeddedConfig.ReadFile("config.yaml")
		if err != nil {
			log.Fatalf("Error reading embedded config file: %v", err)
		}
	}
	err = yaml.Unmarshal(bytes, &Data)
	if err != nil {
		log.Fatalf("Error parsing config file: %v", err)
	}
}
上面的init函数,我们使用os.ReadFile函数读取config.yaml文件中的内容到bytes数组中,
如果外部配置文件不存在,那么我们就调用打包进二进制文件的默认config.yaml文件,读取到bytes数组中,然后解析到Data公共变量中
然后我们使用yaml.Unmarshal把config.yaml中的数据解析到Data公共变量中
完整代码
package config

import (
	"embed"
	"fmt"
	"gopkg.in/yaml.v3"
	"log"
	"os"
)

type Config struct {
	Domain string `yaml:"domain"`
	Port   string `yaml:"port"`
	Auth   struct {
		Token string `yaml:"token"`
	} `yaml:"auth"`
}

//go:embed config.yaml
var EmbeddedConfig embed.FS

var Data Config

func init() {
	var bytes []byte
	var err error
	bytes, err = os.ReadFile("config/config.yaml")
	if err != nil {
		fmt.Println("读取外部配置失败")
		bytes, err = EmbeddedConfig.ReadFile("config.yaml")
		if err != nil {
			log.Fatalf("Error reading embedded config file: %v", err)
		}
	}
	err = yaml.Unmarshal(bytes, &Data)
	if err != nil {
		log.Fatalf("Error parsing config file: %v", err)
	}
}
四. 随机字符串生成 utils/utils.go
完整代码
package utils

import "crypto/rand"

func GenerateRandomString(n int) (string, error) {
	const letters = "abcdefghijklmnopqrstuvwxyzABCDEFGHIJKLMNOPQRSTUVWXYZ0123456789"
	bytes := make([]byte, n)
	if _, err := rand.Read(bytes); err != nil {
		return "", err
	}
	for i, b := range bytes {
		bytes[i] = letters[b%byte(len(letters))]
	}
	return string(bytes), nil
}
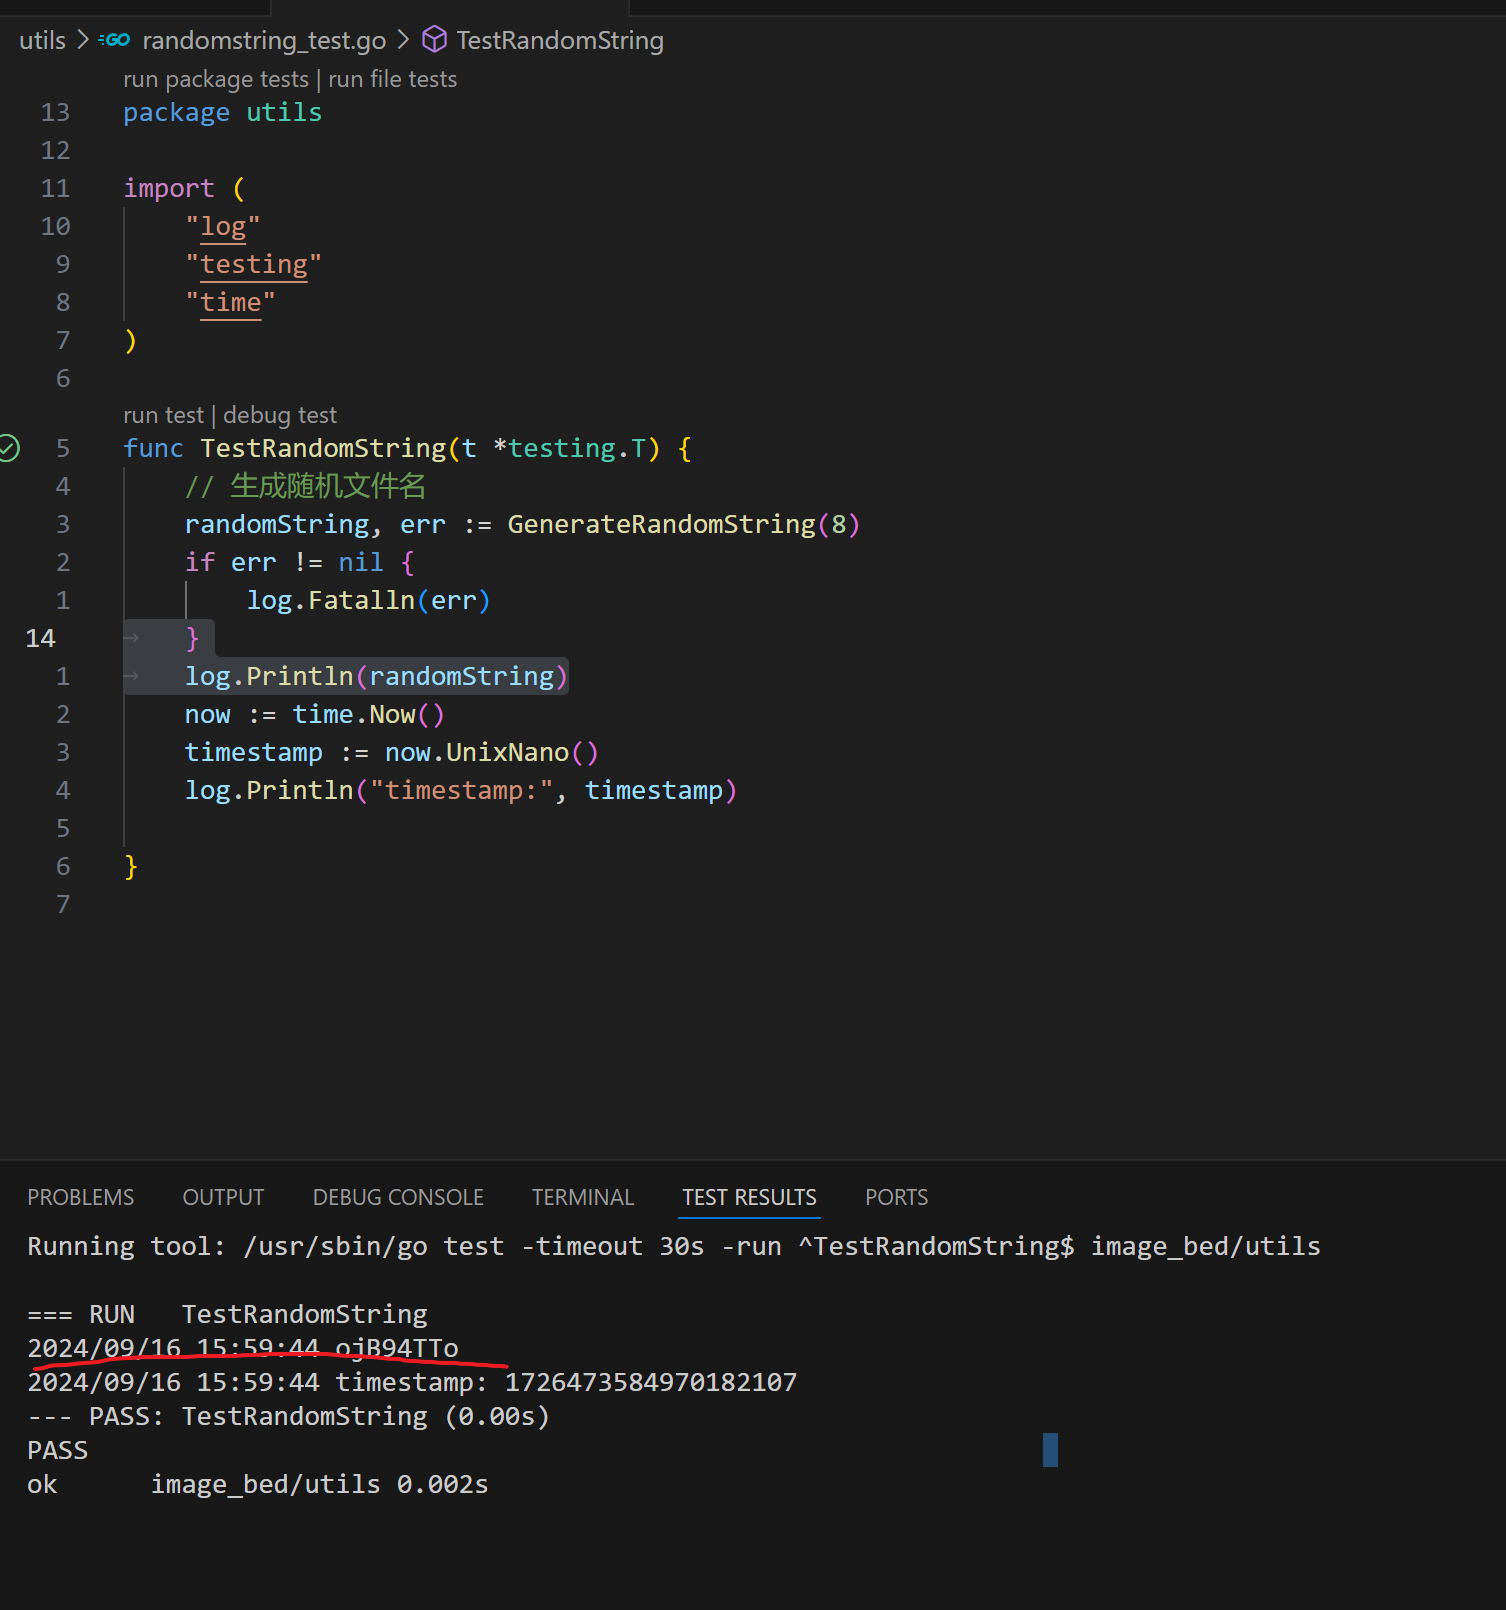
这个函数能生成n位的随机字符串
bytes := make([]byte, n):
- 这行代码使用
make函数创建一个长度为n的byte切片(类似于一个字节数组)。 byte类型代表一个 8 位的无符号整数(即 0 到 255 的值)。- 通过
make([]byte, n),你创建了一个初始长度为n的切片,用来存储后续生成的随机字节。
if _, err := rand.Read(bytes); err != nil { return "", err }:
rand.Read(bytes)调用了 Go 标准库中的crypto/rand包中的Read函数,用来生成加密级别的随机数据。- 该函数会随机填充
bytes切片中的每一个元素,使得每个字节都包含一个 0 到 255 之间的随机值。 rand.Read返回两个值:生成的随机字节数(这个你不需要,所以用_忽略掉)和一个可能的错误。- 如果生成随机字节的过程出现错误,函数会立即返回空字符串
""和错误err。否则,代码继续执行。
for i, b := range bytes { ... }:
- 这是一个循环,遍历
bytes切片中的每一个元素。 i是当前字节在切片中的索引(位置)。b是当前字节的值,范围是0到255(因为byte是 8 位无符号整数)。
bytes[i] = letters[b%byte(len(letters))]:
letters是一个包含字母和数字的字符串,定义为:"abcdefghijklmnopqrstuvwxyzABCDEFGHIJKLMNOPQRSTUVWXYZ0123456789"。这是你用来生成随机字符串的字符集。len(letters)返回letters中字符的总数,即62(26 个小写字母 + 26 个大写字母 + 10 个数字)。b%byte(len(letters))是用当前字节的值b对62取模,结果范围是0到61。这将把随机生成的字节值限制在letters的索引范围内。letters[b%byte(len(letters))]通过索引来从letters字符串中取出对应的字符。- 最后,将该字符赋值给
bytes[i],即用letters中的字符替换bytes中的原始字节值。
假设 bytes 中的一个值是 150,len(letters) 是 62,那么:
150 % 62 = 26- 因此,
letters[26]将会返回字符'A'(letters字符串中大写字母的起始位置)。
五.编写路由 router/router.go
完整代码
package router

import (
	"image_bed/controllers"

	"github.com/gin-gonic/gin"
)

func SetUpImageBedRoute(router *gin.Engine) {
	ImageBedGroup := router.Group("/")
	{
		ImageBedGroup.POST("/upload", controllers.UploadImage)
		ImageBedGroup.GET("/i/:year/:month/:day/:filename", controllers.GetImage)
	}
}
-
上面的代码中,我们常见了一个路由组,响应
/的请求 -
上传路由:对于来自
/upload路径的Post请求,我们要求controllers.UploadImage这个控制器函数进行处理 -
获取图片路由:对于来自
/i/:year/:month/:day/:filename,这里用到了gin的路由动态参数,year,month,day,filename会被当做参数传递给GetImage控制器,可以用c.Param(param_name)获取
比如我想获取/i/2024/05/12/cat.png中的图片名,就可以这么获取
func _param(c *gin.Context) {
    param := c.Param("filename")
    fmt.Println(param)
}
上传路由负责接收客户端上传的图片并处理,返回图片链接
获取图片路由负责响应图片给客户端
Go语言 Web框架GinGo语言 Web框架Gin 返回各种值 返回字符串 返回json 返回map 返回原始json - 掘金 (juejin.cn)
gin动态路由用法可以看上面的链接
六.控制器部分controllers/upload_controller.go
安全校验
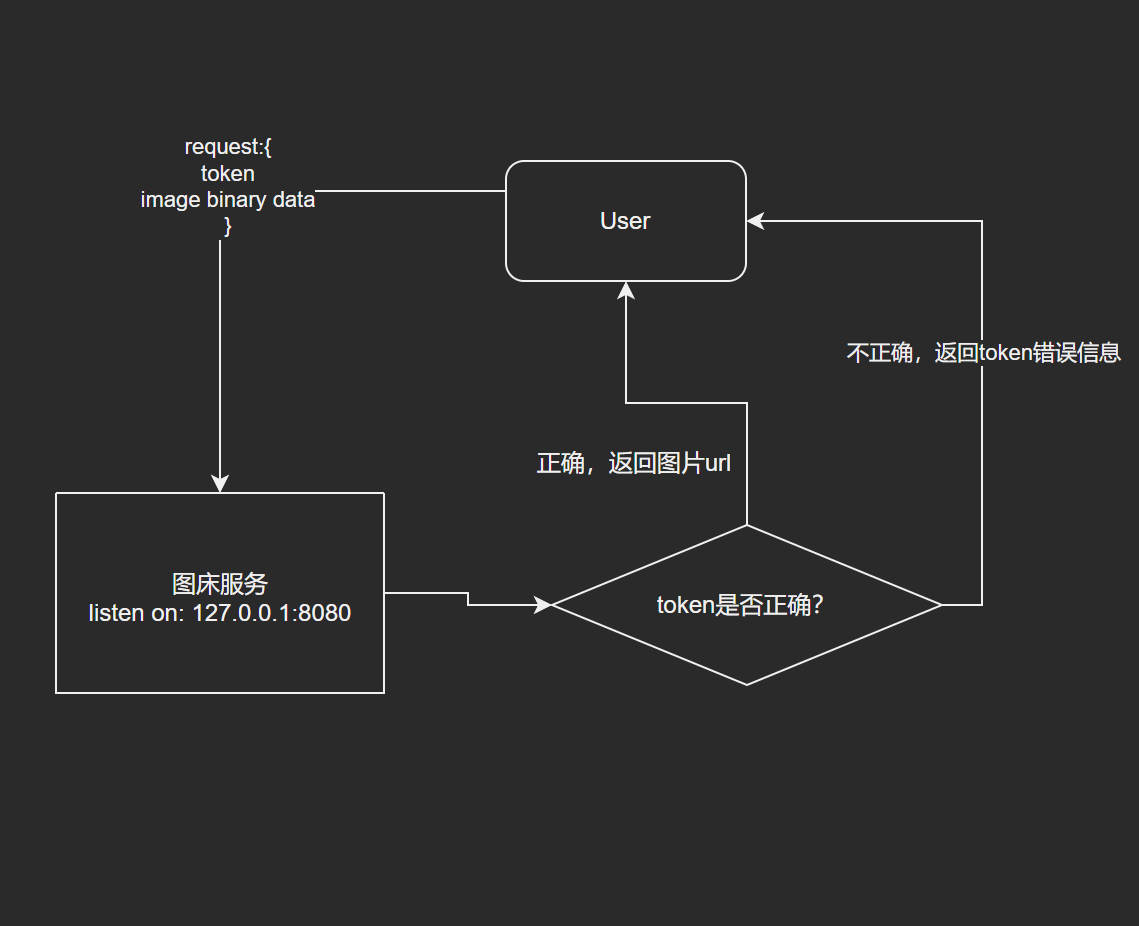
我们自己的图床当然不希望别人能随便上传任何图片,因此需要一个安全验证
我们声明一个secretKey来存储来自配置文件中的Token
// 定义一个常量作为秘钥(在实际应用中,请从配置文件或环境变量中获取)
var secretKey string = config.Data.Auth.Token
上传控制器函数
首先我们要校验上传图片的用户是不是我,用 token := c.PostForm("token")拿到token,与secretKey进行比对
if token != secretKey {
		c.JSON(http.StatusUnauthorized, gin.H{"error": "Invalid API key"})
		return
	}
如果不相等,说明token是错误的,这个用户没权利上传图片到我们的服务器上,返回给他错误信息
如果相等,我们就要从form表单中提取出图片了
file, err := c.FormFile("file")
if err != nil {
	c.JSON(http.StatusBadRequest, gin.H{"error": "Failed to get uploaded file"})
	return
}
如果表单里没有file,说明用户没上传图片或者使用的字段是错误的,就告诉他上传失败了
要是找到file了,那我们就要先存储这个图片到服务器上了
// 打开上传的文件
	src, err := file.Open()
	if err != nil {
		c.JSON(http.StatusInternalServerError, gin.H{"error": "Failed to open uploaded file"})
		return
	}
	defer src.Close()
// 解码图片
	img, format, err := image.Decode(src)
	if err != nil {
		c.JSON(http.StatusInternalServerError, gin.H{"error": "Failed to decode image"})
		return
	}

	// 检查文件格式
	if format != "jpeg" && format != "png" {
		c.JSON(http.StatusBadRequest, gin.H{"error": "Only JPEG and PNG formats are supported"})
		return
	}
	// 获取当前时间
	now := time.Now()
	year := now.Format("2006")
	month := now.Format("01")
	day := now.Format("02")

	// 构建目录路径
	uploadPath := filepath.Join("./uploads", year, month, day)
	if err := os.MkdirAll(uploadPath, os.ModePerm); err != nil {
		c.JSON(http.StatusInternalServerError, gin.H{"error": "Failed to create upload directory"})
		return
	}
/*
os.ModePerm 的值为 0777,表示 UNIX 风格的文件权限系统中的权限位,具体分为以下三部分:

用户权限(User permissions):文件所有者的权限(rwx)。
组权限(Group permissions):与文件所有者同组的用户权限(rwx)。
其他用户权限(Other permissions):其他用户的权限(rwx)。
*/
上面的代码分别完成了图片打开,然后解码图片获取图片的信息,查看是不是常见图片格式:jpg或者png
如果不是就告诉用户不支持他上传的这种图片格式
接下来就是创建图片所在的目录了,我们这里采用https://pic.meowrain.cn/year/month/day/xxx.webp这种存储路径,所以需要程序创建对应的文件夹,如果你在2024年9月11日上传了一张图片xxx.jpg,程序会在目录下创建uploads/2024/09/11/路径
uploadPath := filepath.Join("./uploads", year, month, day)
uploadPath这个变量存储的就是上传的路径
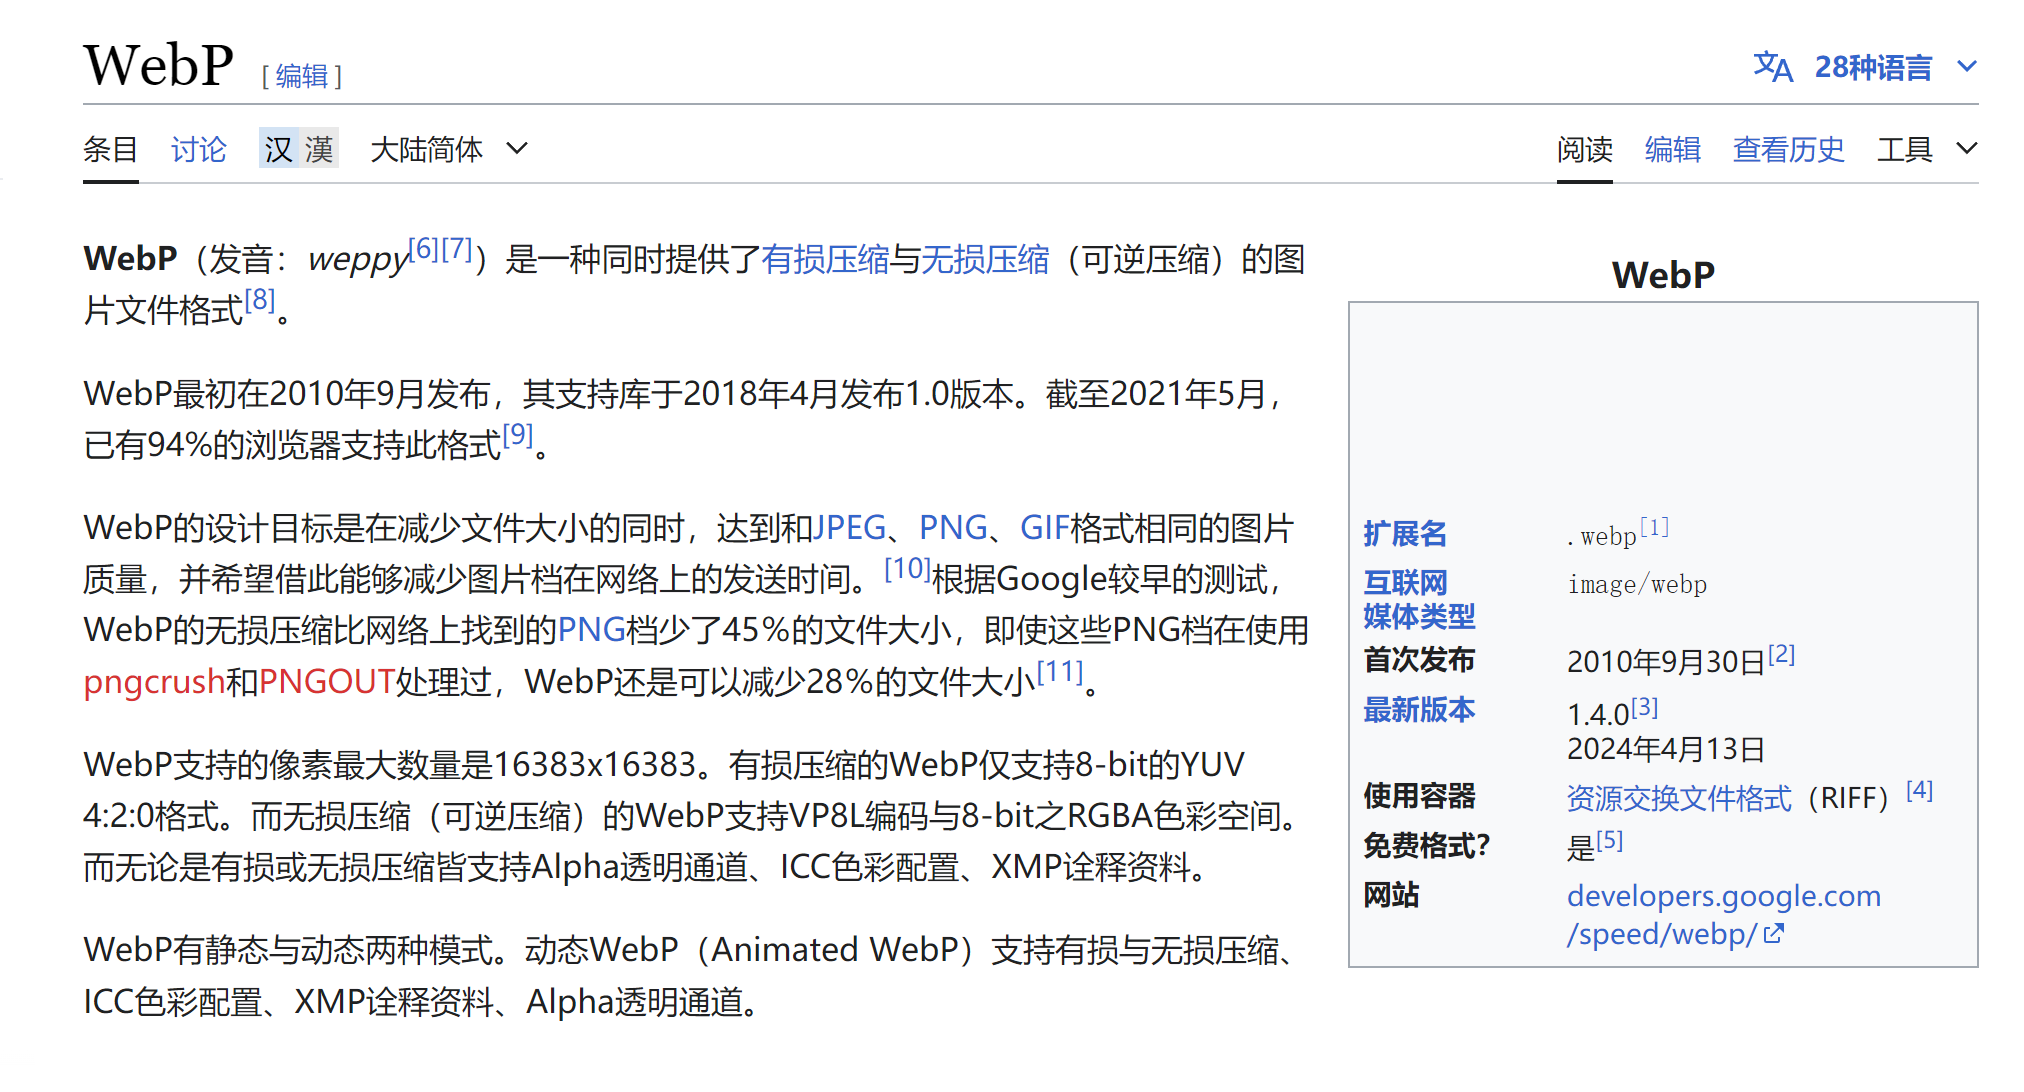
接下来我们要把图片由jpg或者png转换为webp,为什么要转?可以看下面的介绍
	// 构建 WebP 文件路径
	randomString, err := utils.GenerateRandomString(6)
	if err != nil {
		log.Println("构建随机字符串失败")
	}
	timestamp := now.UnixNano()
	fileName := randomString + strconv.FormatInt(timestamp, 10)
	webpFileName := fmt.Sprintf("%s.webp", fileName)
	webpFilePath := filepath.Join(uploadPath, webpFileName)

	// 创建 WebP 文件
	out, err := os.Create(webpFilePath)
	if err != nil {
		c.JSON(http.StatusInternalServerError, gin.H{"error": "Failed to create WebP file"})
		return
	}
	defer out.Close()

	// 编码并保存图片为 WebP 格式
	err = webp.Encode(out, img, &webp.Options{Lossless: true})
	if err != nil {
		c.JSON(http.StatusInternalServerError, gin.H{"error": "Failed to encode image to WebP"})
		return
	}
这部分代码首先调用了[随机字符串生成](#四. 随机字符串生成 utils/utils.go) 见上面四,创建了一个随机的6位字符串,为了防止图片名字相撞(虽然几率特别小🤷♂️),我们再给图片名加上时间戳
webpFileName := fmt.Sprintf("%s.webp", fileName)
然后我们就有了文件存储的完整路径了
webpFilePath := filepath.Join(uploadPath, webpFileName)
然后我们进行转换
	// 创建 WebP 文件
	out, err := os.Create(webpFilePath)
	if err != nil {
		c.JSON(http.StatusInternalServerError, gin.H{"error": "Failed to create WebP file"})
		return
	}
	defer out.Close()

	// 编码并保存图片为 WebP 格式
	err = webp.Encode(out, img, &webp.Options{Lossless: true})
	if err != nil {
		c.JSON(http.StatusInternalServerError, gin.H{"error": "Failed to encode image to WebP"})
		return
	}
webp这个库怎么用可以看官方文档
接下来就要返回给用户完整的url路径了
// 返回 WebP 文件的 URL
	imageURL := fmt.Sprintf("%s/i/%s/%s/%s/%s", config.Data.Domain, year, month, day, webpFileName)
	c.JSON(http.StatusOK, gin.H{"result": "success", "code": http.StatusOK, "url": imageURL})
完整代码
package controllers

import (
	"fmt"
	"image"
	_ "image/jpeg" // 注册JPEG解码器
	_ "image/png"  // 注册PNG解码器
	"image_bed/config"
	"image_bed/utils"
	"log"
	"net/http"
	"os"
	"path/filepath"
	"strconv"
	"time"

	"github.com/chai2010/webp"
	"github.com/gin-gonic/gin"
)

// 定义一个常量作为秘钥(在实际应用中,请从配置文件或环境变量中获取)
var secretKey string = config.Data.Auth.Token

func UploadImage(c *gin.Context) {
	token := c.PostForm("token")
	if token != secretKey {
		c.JSON(http.StatusUnauthorized, gin.H{"error": "Invalid API key"})
		return
	}
	file, err := c.FormFile("file")
	if err != nil {
		c.JSON(http.StatusBadRequest, gin.H{"error": "Failed to get uploaded file"})
		return
	}

	// 打开上传的文件
	src, err := file.Open()
	if err != nil {
		c.JSON(http.StatusInternalServerError, gin.H{"error": "Failed to open uploaded file"})
		return
	}
	defer src.Close()

	// 解码图片
	img, format, err := image.Decode(src)
	if err != nil {
		c.JSON(http.StatusInternalServerError, gin.H{"error": "Failed to decode image"})
		return
	}

	// 检查文件格式
	if format != "jpeg" && format != "png" {
		c.JSON(http.StatusBadRequest, gin.H{"error": "Only JPEG and PNG formats are supported"})
		return
	}

	// 获取当前时间
	now := time.Now()
	year := now.Format("2006")
	month := now.Format("01")
	day := now.Format("02")

	// 构建目录路径
	uploadPath := filepath.Join("./uploads", year, month, day)
	if err := os.MkdirAll(uploadPath, os.ModePerm); err != nil {
		c.JSON(http.StatusInternalServerError, gin.H{"error": "Failed to create upload directory"})
		return
	}

	// 构建 WebP 文件路径
	randomString, err := utils.GenerateRandomString(6)
	if err != nil {
		log.Println("构建随机字符串失败")
	}
	timestamp := now.UnixNano()
	fileName := randomString + strconv.FormatInt(timestamp, 10)
	webpFileName := fmt.Sprintf("%s.webp", fileName)
	webpFilePath := filepath.Join(uploadPath, webpFileName)

	// 创建 WebP 文件
	out, err := os.Create(webpFilePath)
	if err != nil {
		c.JSON(http.StatusInternalServerError, gin.H{"error": "Failed to create WebP file"})
		return
	}
	defer out.Close()

	// 编码并保存图片为 WebP 格式
	err = webp.Encode(out, img, &webp.Options{Lossless: true})
	if err != nil {
		c.JSON(http.StatusInternalServerError, gin.H{"error": "Failed to encode image to WebP"})
		return
	}

	// 返回 WebP 文件的 URL
	imageURL := fmt.Sprintf("%s/i/%s/%s/%s/%s", config.Data.Domain, year, month, day, webpFileName)
	c.JSON(http.StatusOK, gin.H{"result": "success", "code": http.StatusOK, "url": imageURL})
}
访问图片控制器函数
完整代码
func GetImage(c *gin.Context) {
	year := c.Param("year")
	month := c.Param("month")
	day := c.Param("day")
	filename := c.Param("filename")

	filePath := filepath.Join("./uploads", year, month, day, filename)
	if _, err := os.Stat(filePath); os.IsNotExist(err) {
		c.JSON(http.StatusNotFound, gin.H{"result": "false", "code": http.NotFound, "error": "Image not found"})
		return
	}

	c.File(filePath)
}
就是直接获取来自前端的动态参数,
	year := c.Param("year")
	month := c.Param("month")
	day := c.Param("day")
	filename := c.Param("filename")
然后拼出完整路径
filePath := filepath.Join("./uploads", year, month, day, filename)
找这个图片存在不存在,不存在返回错误
	if _, err := os.Stat(filePath); os.IsNotExist(err) {
		c.JSON(http.StatusNotFound, gin.H{"result": "false", "code": http.NotFound, "error": "Image not found"})
		return
	}
找到了以后直接返回
c.File(filePath)
七.main函数部分
package main

import (
	"github.com/gin-contrib/cors"
	"github.com/gin-gonic/gin"
	"image_bed/config"
	. "image_bed/router"
)

func main() {

	r := gin.Default()
	r.Use(cors.New(cors.Config{ // 使用CORS中间件
		AllowAllOrigins:  true,                                                                  // 允许所有来源
		AllowMethods:     []string{"GET", "PUT", "POST", "DELETE", "PATCH", "OPTIONS"},          // 允许的HTTP方法
		AllowHeaders:     []string{"Origin", "Content-Length", "Content-Type", "Authorization"}, // 允许的请求头
		ExposeHeaders:    []string{"Content-Length"},                                            // 公开的响应头
		AllowCredentials: true,                                                                  // 允许发送凭据 		// 预检请求的有效期
	}))
	SetUpImageBedRoute(r)
	if err := r.Run(":" + config.Data.Port); err != nil {
		panic(err)
	}
}
首先为了防止跨域(可以整合这个程序到自己写的其它服务中,如果你用电脑上的图床软件,比如picgo或者Piclist上传图片,那可以不加cors这个中间件)
掉用route中的SetUpImageBedRoute函数,让其运行再配置文件中的端口上
	r := gin.Default()
	SetUpImageBedRoute(r)
	if err := r.Run(":" + config.Data.Port); err != nil {
		panic(err)
	}
八.测试代码
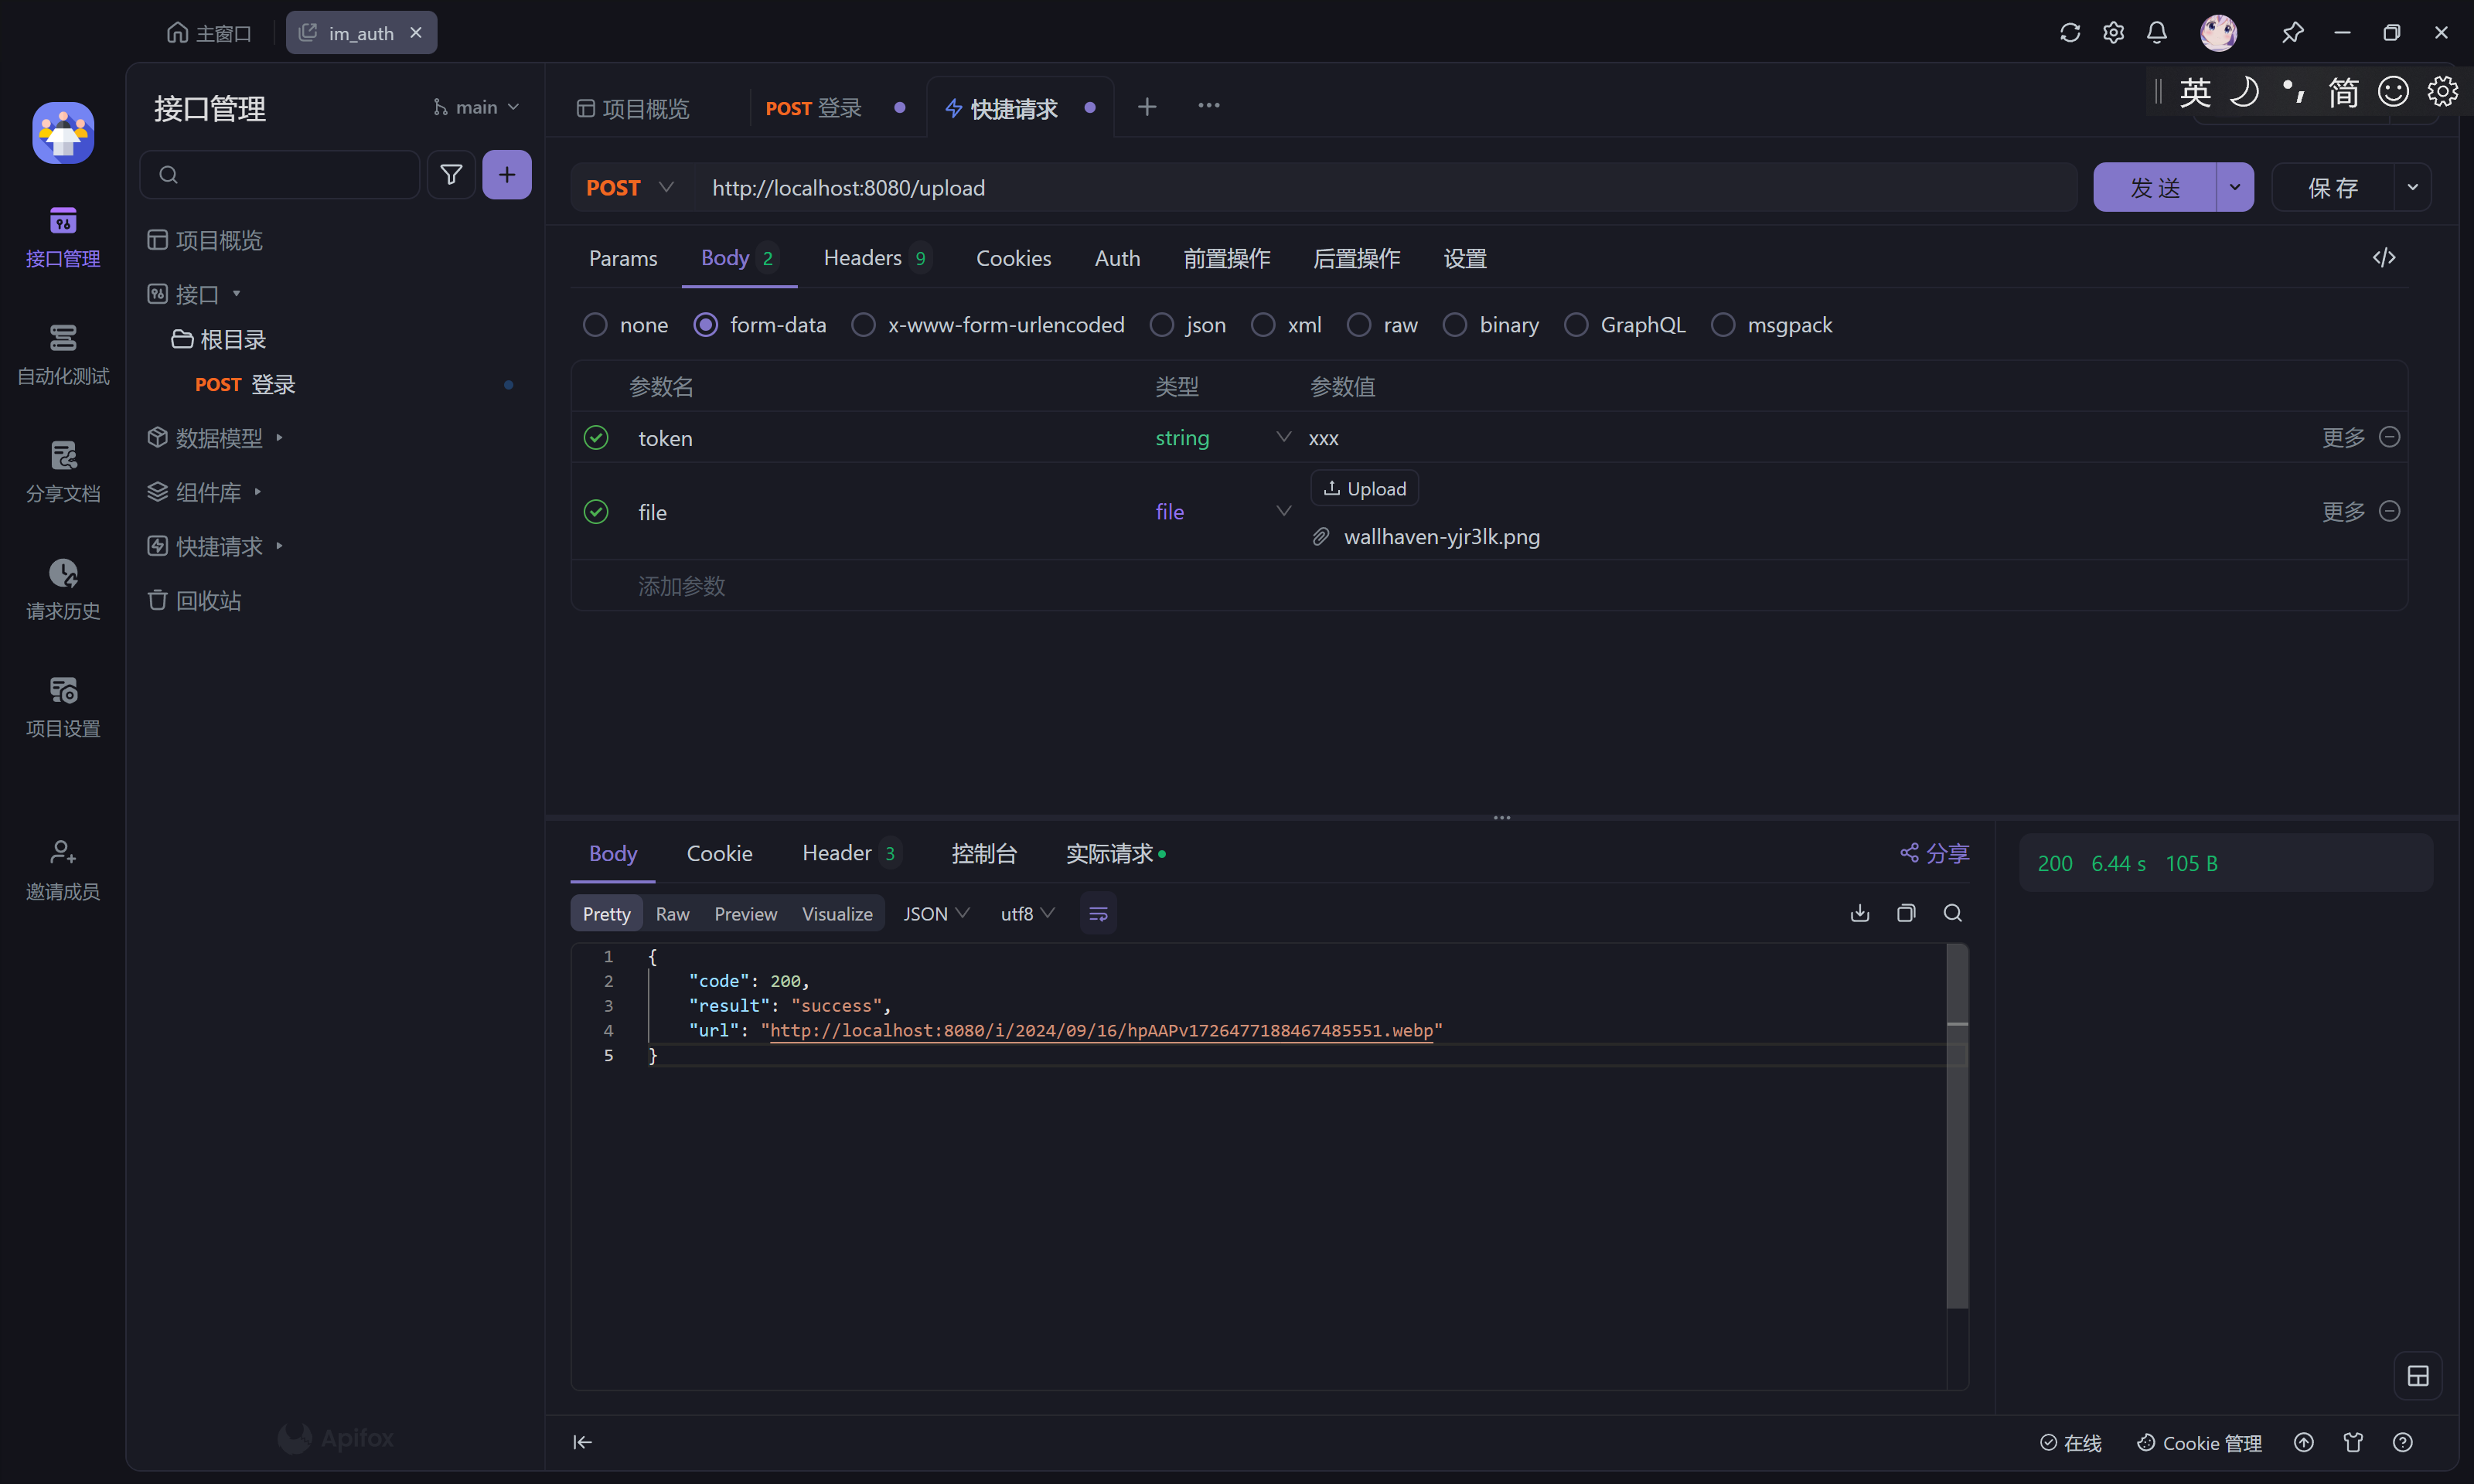
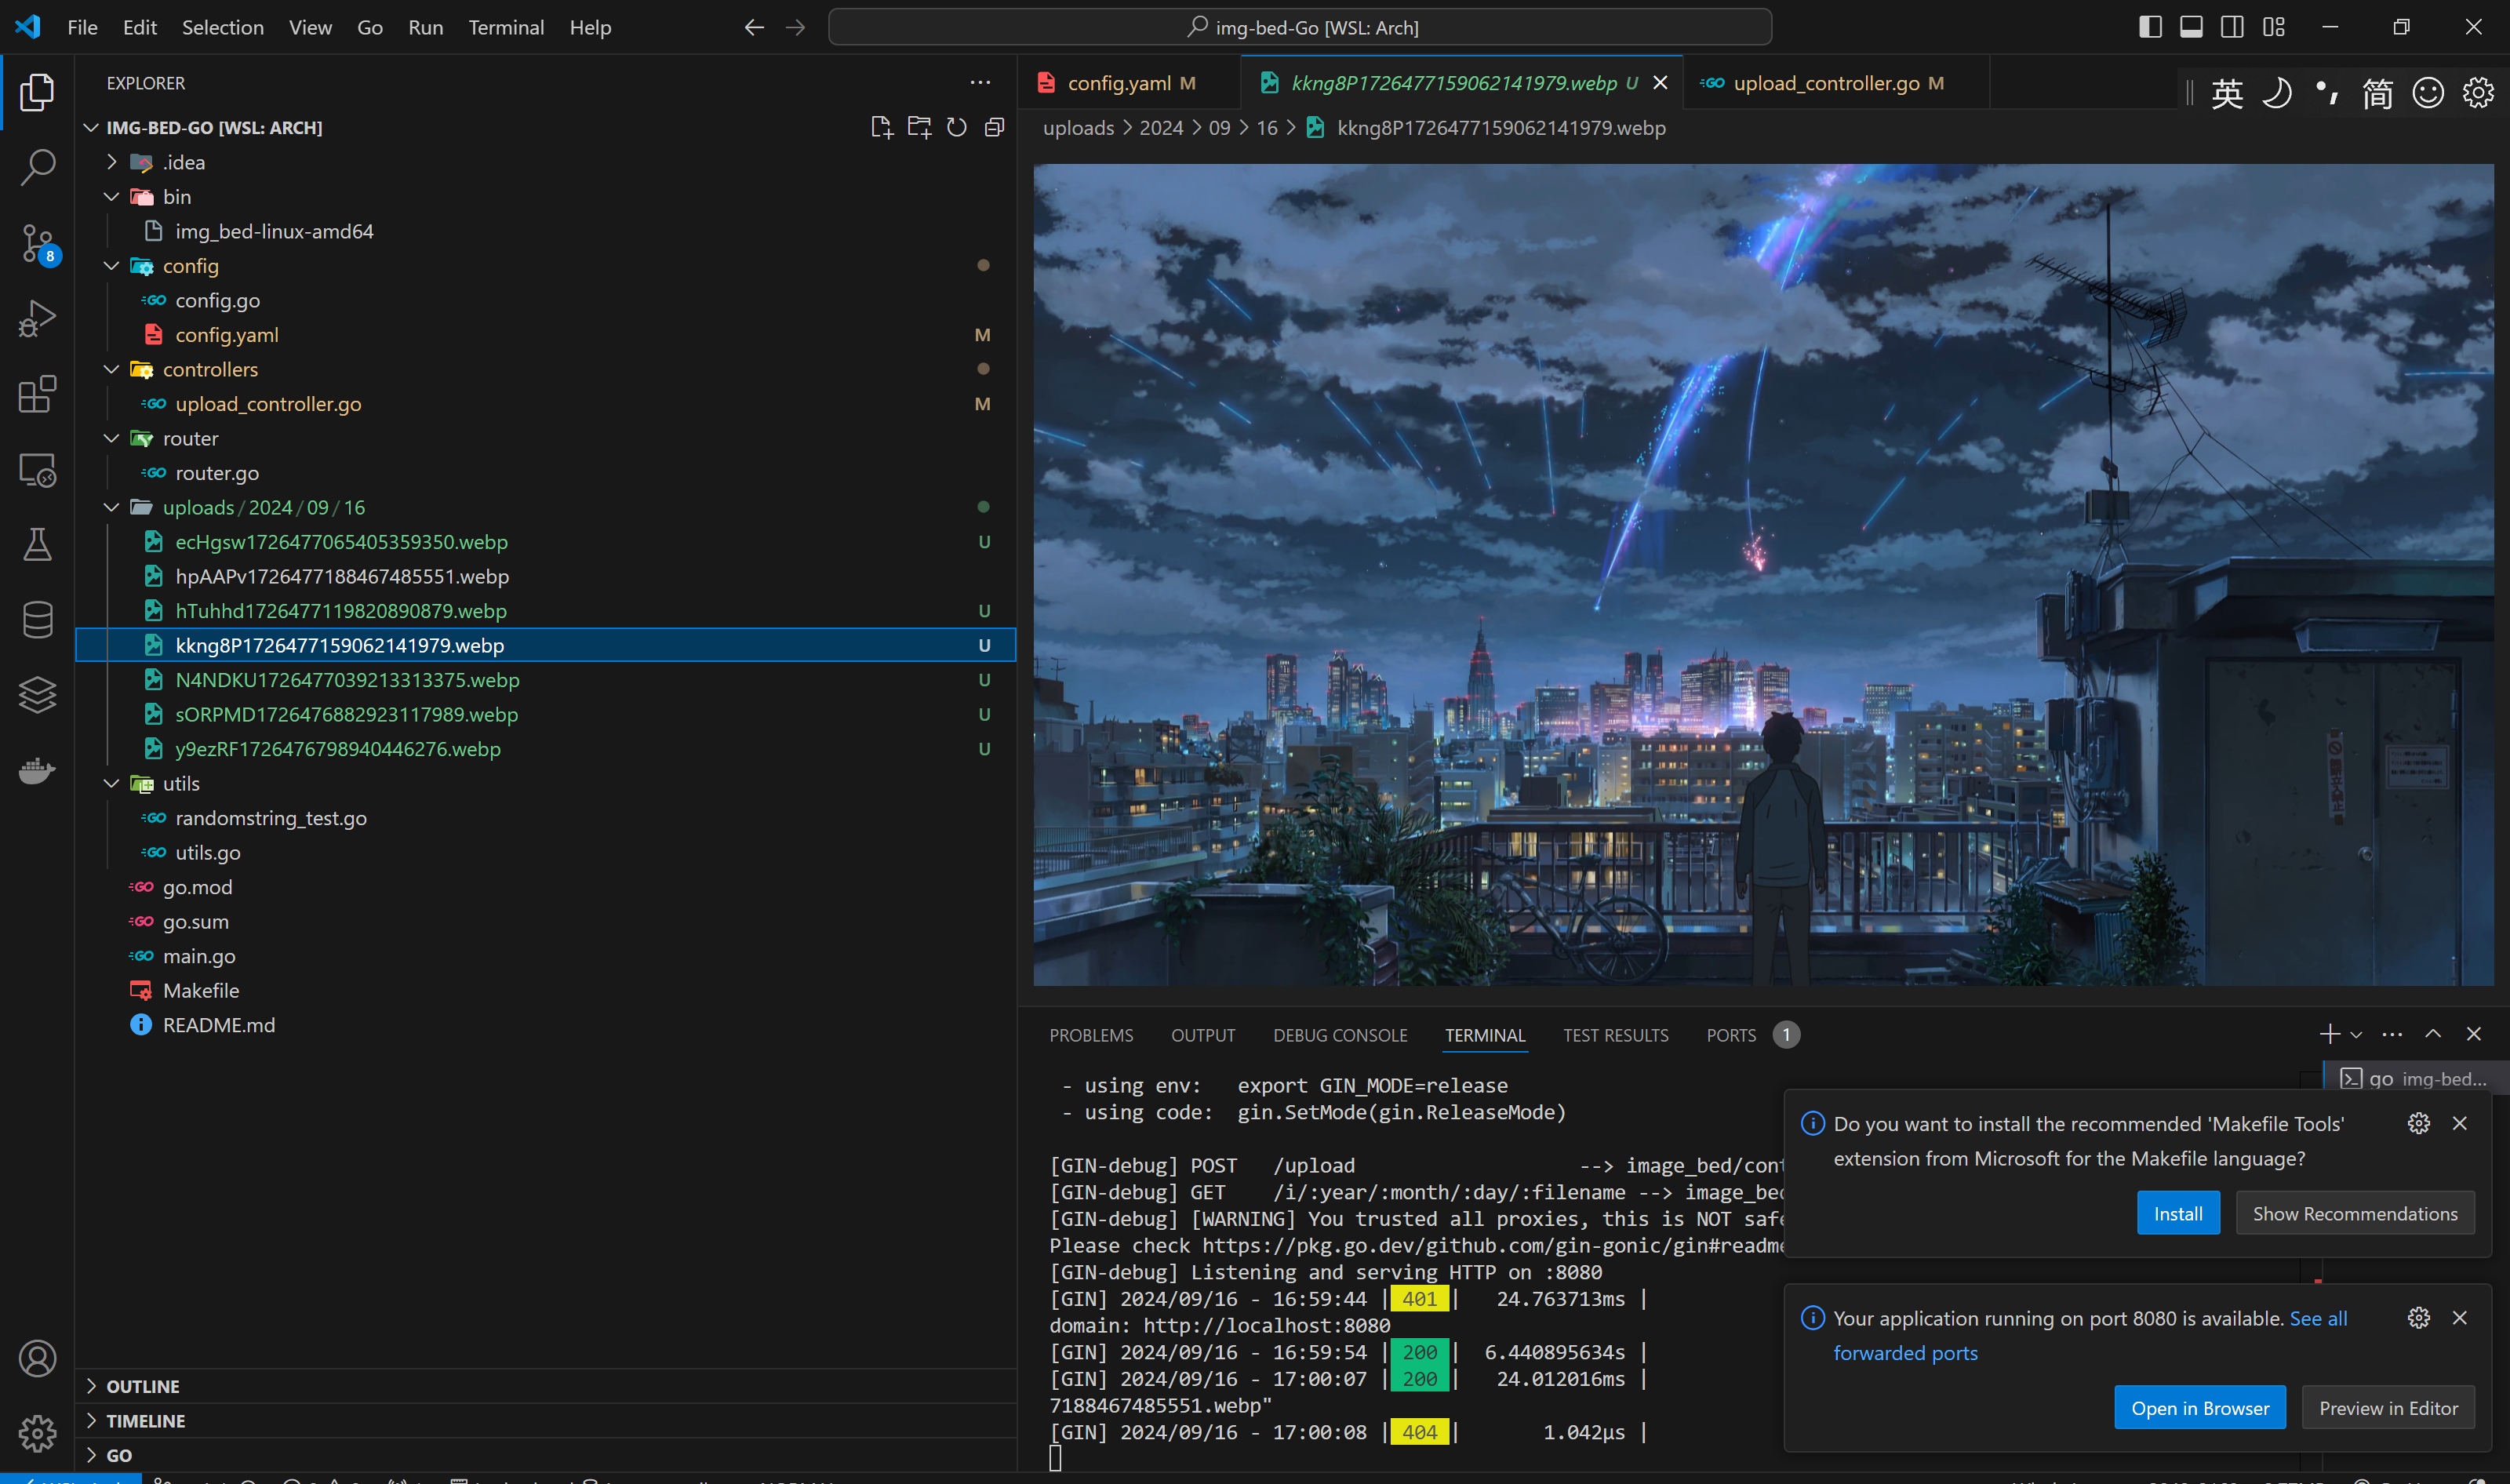
go run main.go

上传个图片试试
访问看看

九.部署
修改config.yaml为自己的配置
domain: "https://pic.meowrain.cn"
port: 8080
auth:
  token: pic # demo
编写makefile
# 项目名
PROJECT_NAME := img_bed

# 源代码目录
SRC_DIR := .

# 输出目录
OUT_DIR := ./bin

# Go 编译器
GO := go

# 目标平台
PLATFORMS := linux/amd64

# 默认目标
.PHONY: all
all: clean build

# 清理
.PHONY: clean
clean:
	rm -rf $(OUT_DIR)

# 创建输出目录
.PHONY: create-out-dir
create-out-dir:
	mkdir -p $(OUT_DIR)

# 构建
.PHONY: build
build: create-out-dir $(PLATFORMS)

# 针对每个平台编译
$(PLATFORMS):
	GOOS=$(word 1, $(subst /, ,$@)) GOARCH=$(word 2, $(subst /, ,$@)) \
	$(GO) build -o $(OUT_DIR)/$(PROJECT_NAME)-$(word 1, $(subst /, ,$@))-$(word 2, $(subst /, ,$@))$(if $(findstring windows,$@),.exe) $(SRC_DIR)

# 测试
.PHONY: test
test:
	$(GO) test ./...

# 安装依赖
.PHONY: deps
deps:
	$(GO) mod tidy

# 使用方法
.PHONY: help
help:
	@echo "Usage:"
	@echo "  make            - 编译所有平台的可执行文件"
	@echo "  make clean      - 清理输出目录"
	@echo "  make build      - 编译所有平台的可执行文件"
	@echo "  make test       - 运行测试"
	@echo "  make deps       - 安装依赖"
	@echo "  make help       - 显示此帮助信息"
使用make编译


编写nginx反向代理
server {
    listen 80;
    server_name pic.meowrain.cn;

    # 301 Redirect HTTP to HTTPS
    location / {
        return 301 https://$host$request_uri;
    }
}

server {
    listen 443 ssl;
    server_name pic.meowrain.cn;

    # SSL configuration
    ssl_certificate /path/to/your/certificate.crt;
    ssl_certificate_key /path/to/your/private.key;

    # Optionally, you can include additional SSL configurations for better security
    ssl_protocols TLSv1.2 TLSv1.3;
    ssl_ciphers 'TLS_AES_128_GCM_SHA256:TLS_AES_256_GCM_SHA384:TLS_CHACHA20_POLY1305_SHA256:ECDHE-RSA-AES128-GCM-SHA256:ECDHE-RSA-AES256-GCM-SHA384:ECDHE-RSA-AES128-SHA256:ECDHE-RSA-AES256-SHA384:ECDHE-RSA-AES128-SHA:ECDHE-RSA-AES256-SHA';
    ssl_prefer_server_ciphers on;

    location / {
        proxy_pass http://127.0.0.1:8080;
        proxy_set_header Host $host;
        proxy_set_header X-Real-IP $remote_addr;
        proxy_set_header X-Forwarded-For $proxy_add_x_forwarded_for;
        proxy_set_header X-Forwarded-Proto $scheme;
    }
}
上传二进制文件到服务器,然后使用tmux 把它挂在后台,配置piclist,就可以上传了
